6 Sisters, all with names beginning with the letter C, and our amazing Mother...showing off our projects, newly found skills, knowledge and achievements. We're just trying to keep in touch- using technology to span the distance of hundreds of miles that separate us. Sisters C- we're best friends and each other's biggest fans and support.

Tuesday, October 15, 2013

A Beautiful Senior

Here are some of Cami's Senior Pictures.
It was hard to pick one for the year book.  
Cami is just as beautiful on the inside as on the outside!
Pictures taken downtown Denver by REI.


Here are some of the first pictures we had taken.  It was overcast for this day so the Photographer and Cami wanted to retake the pictures.  I thought this first set was really beautiful until I saw the second set.  The sunshine levels make a huge difference.  This set was taken up at Chautauqua.


Thursday, September 12, 2013

O-O-Z, I Mean ZOO with Cousins!

Callie, Cassy and I went to the zoo this week with our little kiddos.  
The 5 of them had a GREAT time together checking out all the cool animals.  The weather was overcast and cool-PERFECT for the zoo! There was hardly anyone there either, so we basically had the place to ourselves.

We Girls, all remember climbing all over these hippos when we were kids (poor Emmie didn't even know the bigger kids were playing...she was stuck in her chair!)

The reptiles and amphibians were pretty active in Tropical Discovery...all of them: the anaconda, Komodo dragons, crocodile, monitors, turtles, snakes, frogs...


This Komodo dragon had it's eye on Aubrey and Jackson!


The crocodile kept swimming right up to the glass where the kids were watching, and bumping it's nose very close to them---it had it's eye on little Emmie!

  The kids loved the carousel too!


Drake overheard Callie talking about going to the O-O-Z this morning and said "You're going to the zoo!"  So much for spelling to keep the kiddos in the dark. Callie, you're going to have to think of another way to talk about it without that little smarty-pants knowing what you're talking about.

It was a fun day at the O-O-Z!


Monday, September 9, 2013

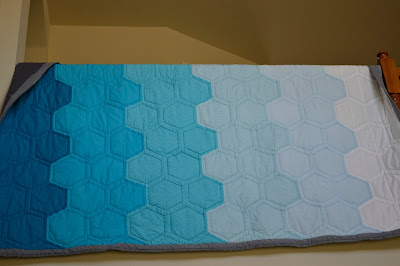
Hexagon Ombre Quilt

It's FINALLY finished!  I've been working on this little beauty (well, actually, it's a large twin size-so not so little) since last summer (in the design/planning stage and actually cutting/sewing since April).  The quilting was a beast since I don't have a quilting machine (think small arm shape to shove a large quilt through) and for most of the actual quilting, I had a small table to work on.  It was worth it though!  Tomorrow, this little beauty is headed to Idaho to keep a new freshman warm and cozy during the long winter months (at least until the first of the year when she's home again and babysitting for me during the day).

I did have a lot of fun working on this project.  I'm really pleased with the hex shapes, especially the quilting design on the back.  I used another much smaller hex quilt as the launching point for the design, but this is all my creation.

I was a little worried about the ombre effect as I was deciding how to lay it out, but I love the way it flows (the colors in the photos don't do it justice).  The same theme is carried onto the back with ombre/solid-patterened-solid there as well.


A HUGE thanks to Mom and Cassy who helped me finish it up last night with the hand stitching of the binding; and to Callie who washed ALL my dishes from family dinner!  THANK YOU!!!

Our favorite babysitter was energetically excited and in awe about her surprise gift when I dropped it off at her house today.  I hope she has an awesome time at school this semester!


And, of course, I had a little helper most of the time...he's always right in the thick of whatever is going on...even if it's sewing.

Friday, August 16, 2013

Onesies


Right now I know about 15 ladies expecting or recently had babies so I decided to decorate some onesies to prepare gifts.  I used fabric paint and electric tape to make most of the onesies.  The two with Mario Brother patches  I made by cross-stitching the patches first.  

Tuesday, June 4, 2013

Denver Temple

We had a ward primary activity at the temple this morning.  It was fun to learn some interesting facts about the temple that I didn't know.  Then, I was back at the temple tonight for our monthly Stake night.  As I was leaving, I remembered that I left my camera in the car from that morning, and the light was great for some photos.  These are my favorites!


Wednesday, February 27, 2013

"Family Tree"

For Christmas this past year, I had this crazy idea to make Mom a "Family Tree".

I used the basic idea from UCREATE and their "Thankful Tree" as my launching point and this is what I came up with...


I really liked the tree UCREATE used, but I wanted to customize this to fit in a particular art niche in Mom's house, and that meant I needed tall and narrow instead of wide...so the type of tree they used just wouldn't have worked very well.  I decided to make a patchwork tree instead, to add some interest and texture (and because Mom likes to quilt).  I created a pattern, traced all my pieces and then assembled everything, basically according to the tutorial from UCREATE.  I used baby clothes pins to attach the photos, so they can be changed out or rearranged as desired.  Thanks to everyone who helped me with photos...including "stealing" them from Mom's computer when she wasn't home!

it kind of looks like a huge ice cream cone!

Monday, February 25, 2013

Piano Book Bags...

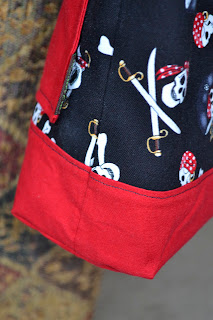
A couple of us are taking piano lessons, and we needed a bag or two to haul our piano books back and forth from the lessons...so I decided to whip them out.  

I had help from the littlest kiddo to pick out the pirate fabric, but the biggest kiddo wanted flames, so since the bag is for him, we decided to make it reversible.  My bag is not, but I used the same basic technique, and added a double hanging / zippered pocket for my keys, phone, etc.  Both bags have boxed out corners, and the flaming pirate bag has matching pockets on both the outside and inside.

MADE has a few good tutorials for making tote type bags, check them out here.